

If you are looking to setup VSCode to start developing with Java in MacOS you are in the right place. Let me help you so you don’t have to suffer like me trying to find why it was’t working!!!
The process is easy to do; and it will take around 10 min.
Download Java SDK and Installation
You need to download the official version of Java DK from Oracle.
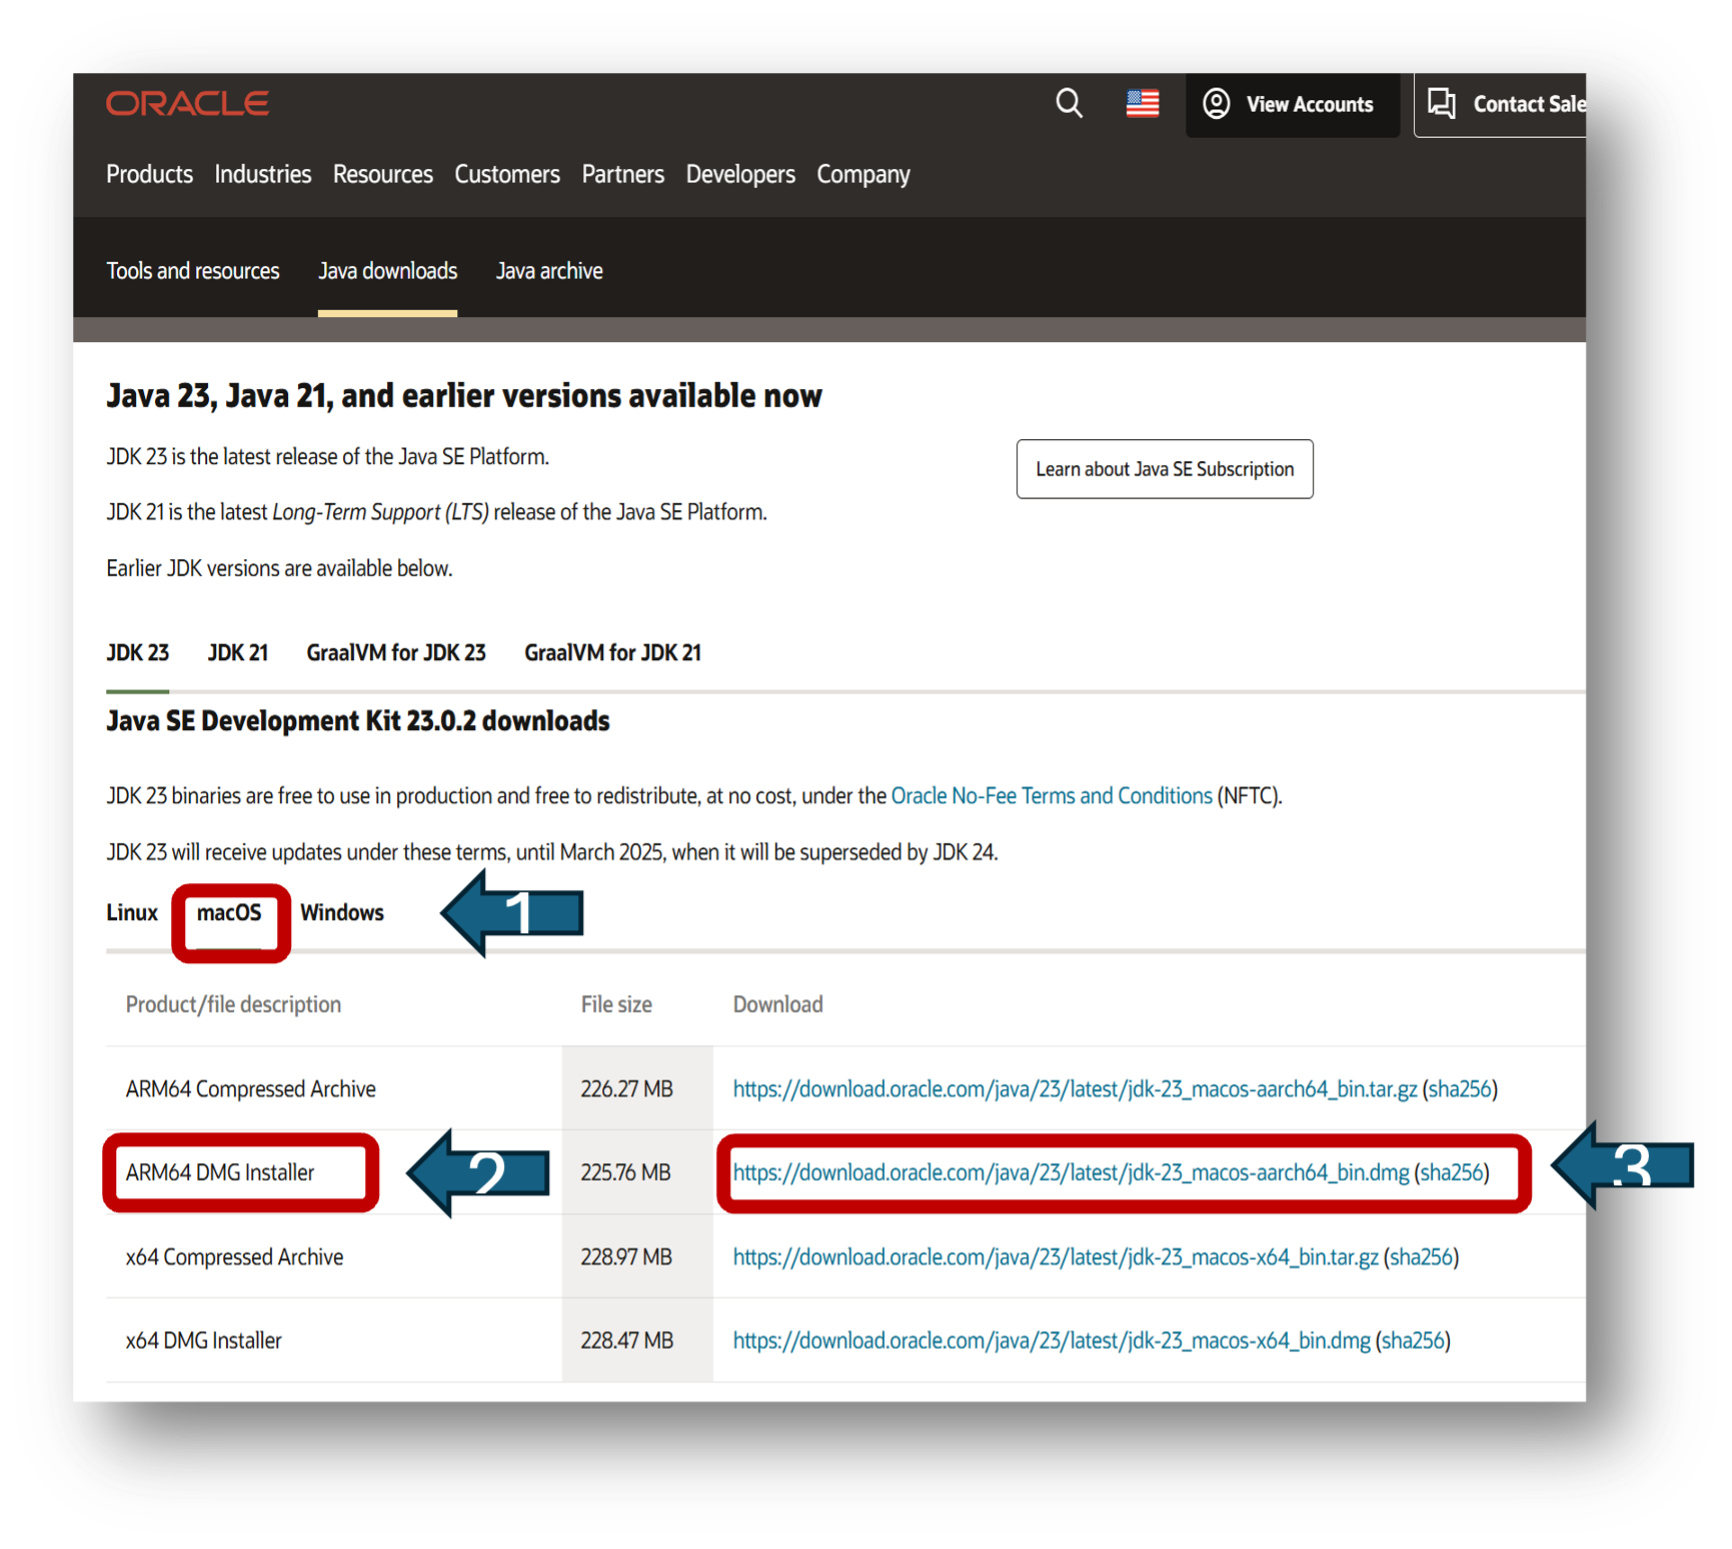
- Select the Operating System in this case MacOS
- Select the DMG Installer if you are using an M processor Mac (if you are using an Intel Mac use the x64DMG Installer at the bottom of the list)
Once the download is completed, click on the file. This will open a new window. Click on the JDK File, it will start the installation process.

Click on “Continue”

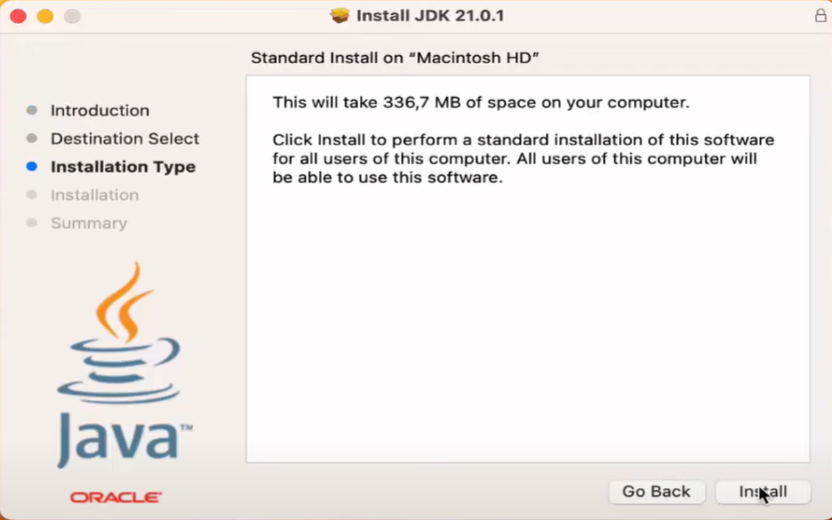
And now click on “Install”
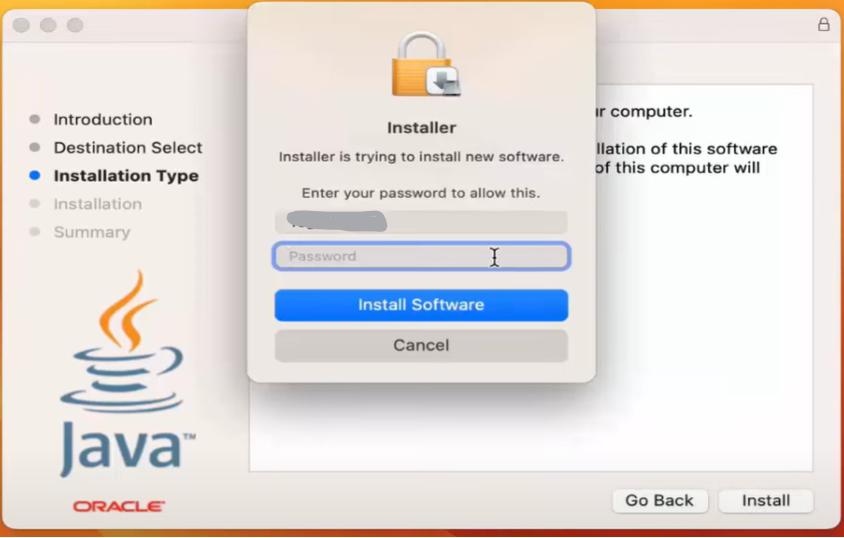
MacOS is going to ask you for your Password, once you introduce your password, click on “Install Software”.
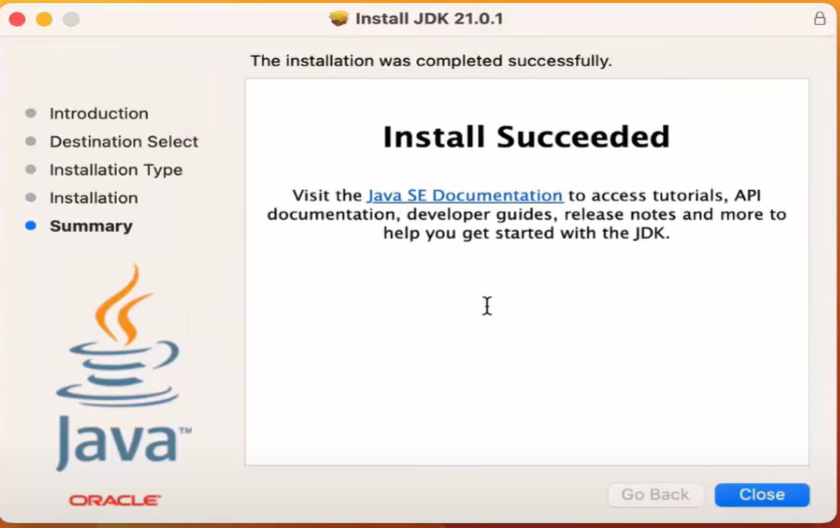
Once the installation is complete, click in “Close”
MacOS is going to ask you if you want to move the installer file to the Bin, click on ”Move to Bin”

Perfect now you have JKD installed in your Mac, but you can’t use it yet, we need to tell VSCode where the JDK is located.
How to Set “JAVA_HOME”
Setting the JAVA_HOME environment variable on macOS is important for ensuring that Java applications and development tools can locate the JDK.
Why Set JAVA_HOME?
- Tool Compatibility: Many Java-based tools and applications rely on the JAVA_HOME variable to find the JDK.
- Consistency: Ensures that the correct version of the JDK is used across different tools and projects.
- Ease of Use: Simplifies the configuration process for development environments like VSCode, Maven, Gradle, etc.
Set JAVA_HOME on macOS
- Find the JDK Path: Open Terminal: You can find Terminal in the Applications > Utilities folder, or you can use Spotlight to search for it. Then run:
| /usr/libexec/java_home -V |
This command will output the version of JDK and the path to the installed JDK, such as:
| Matching Java Virtual Machines (1)21.0.1 (arm64) “Oracle Corporation’ – “Java SE 21.0.1” /Library/Java/JavaVirtualMachines/jdk-21.0.1.jdk/Contents/Home |
- Validate if you have the file “.zshrc”. We will use the command “ls -al” to display all the files in the current directory.

If the file “.zshrc” is not there, use the following command create the file.
| touch .zshrc |
- Set JAVA_HOME : To set JAVA_HOME permanently, you need to add the export command to your shell profile file
- For bash (default on older macOS versions), edit ~/.bash_profile or ~/.bashrc:
| nano ~/.bash_profile |
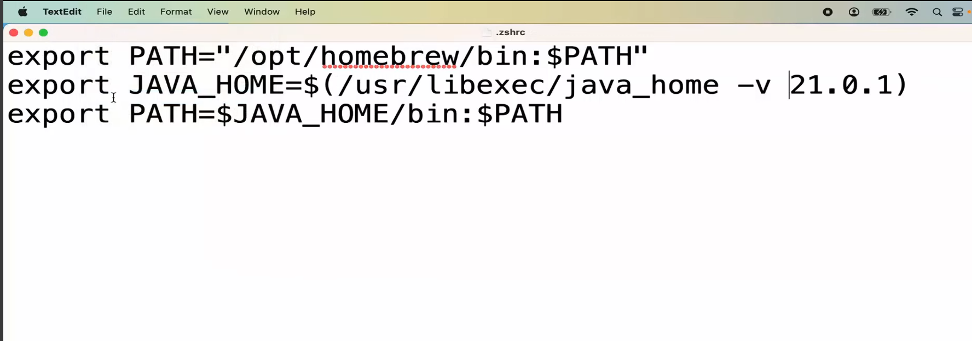
- For zsh (default on macOS Catalina and later), edit ~/.zshrc:
| open ~/.zshrc |
Add the following lines to the file:
| export JAVA_HOME=$(/usr/libexec/java_home -v 21.0.1) export PATH=$JAVA_HOME/bin:$PATH |
After adding these two lines you can save the file.
NOTE: I’m using 21.0.1 at the end of the first line as this is version that installed and want to use, you could have more than one version installed, that’s why is important to be specific.
- Apply the Changes: After editing the file, apply the changes by running:
| source ~/.bash_profile # For bash (old Macs)source ~/.zshrc # For zsh |
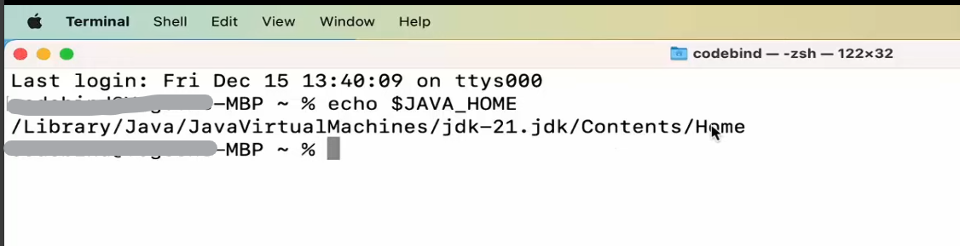
Verification
To verify that JAVA_HOME is set correctly, you can run:
| echo $JAVA_HOME |
This should output the path to your JDK.
How to check what version of JDK do we have installed
To check if the JDK is installed on your Mac, you can follow these steps:
- Open Terminal: You can find Terminal in the Applications > Utilities folder, or you can use Spotlight to search for it.
- Check Java Version: Type the following command and press Enter:
| java -version |
This command will display the installed version of Java, if any. You should see output similar to:
| java version “1.8.0_281″Java(TM) SE Runtime Environment (build 1.8.0_281-b09)Java HotSpot(TM) 64-Bit Server VM (build 25.281-b09, mixed mode) |
- Check JDK Installation: To specifically check for the JDK, you can use:
| javac -version |
This command will show the version of the Java compiler, indicating that the JDK is installed. The output might look like:
| javac 1.8.0_281 |
How to Install VS Code in MacOS.
- Visit Visual Studio Code – Code Editing. Redefined
- Click in the “Download for MacOS” Botton
- Click on the file called “Visual Studio Code” in your “Downloads” Folder
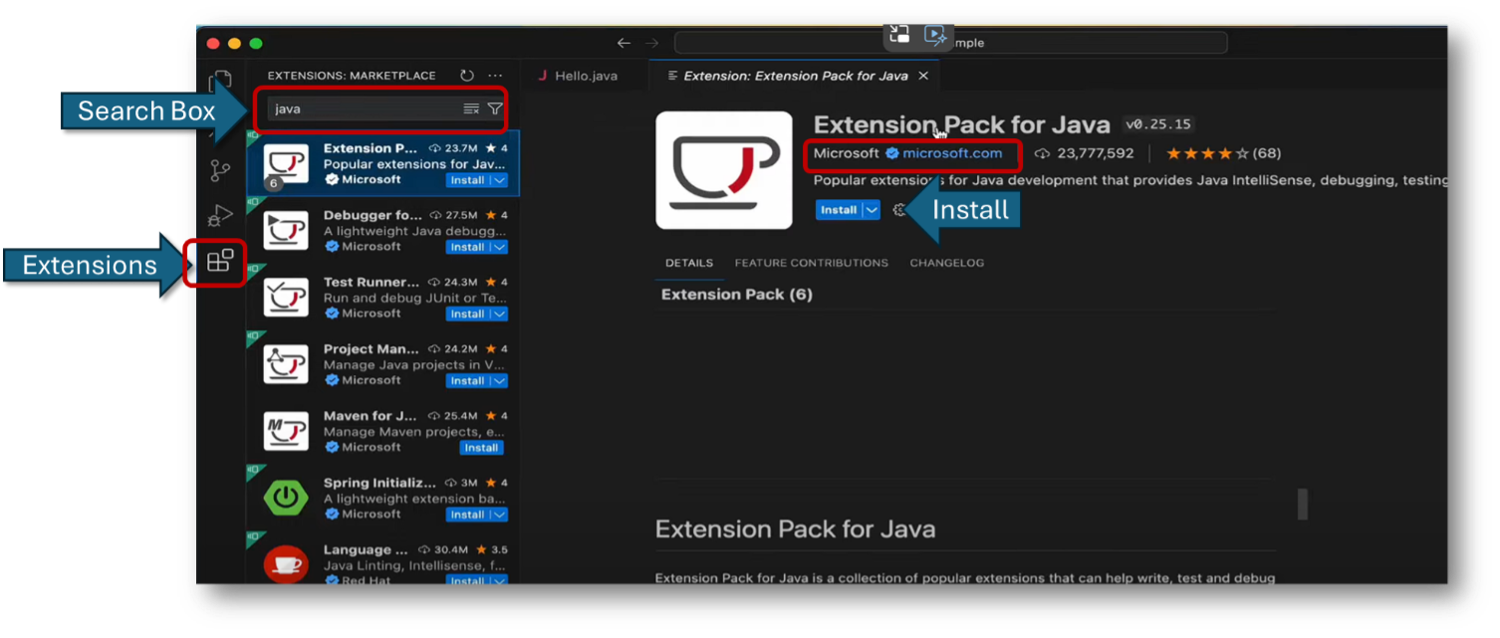
How to Install Java Extensions in VSCode.
In the “Extensions” menu in VSCode, search for “Extension Pack for Java” from Microsoft, now click on install.
This will install a few extensions that complement the tool
Now you are ready to start having fun with Java and VSCode.
Saludos / Best Regards
Ferglo
